
AI video generation has changed the way people create short cinematic videos. You no longer need expensive cameras, a large production team, or a complicated editing setup to turn a simple idea into an emotional visual story. With the right reference Sad Heartbreak AI Prompt images and a carefully written prompt, AI video tools can create scenes that look cinematic and connected.
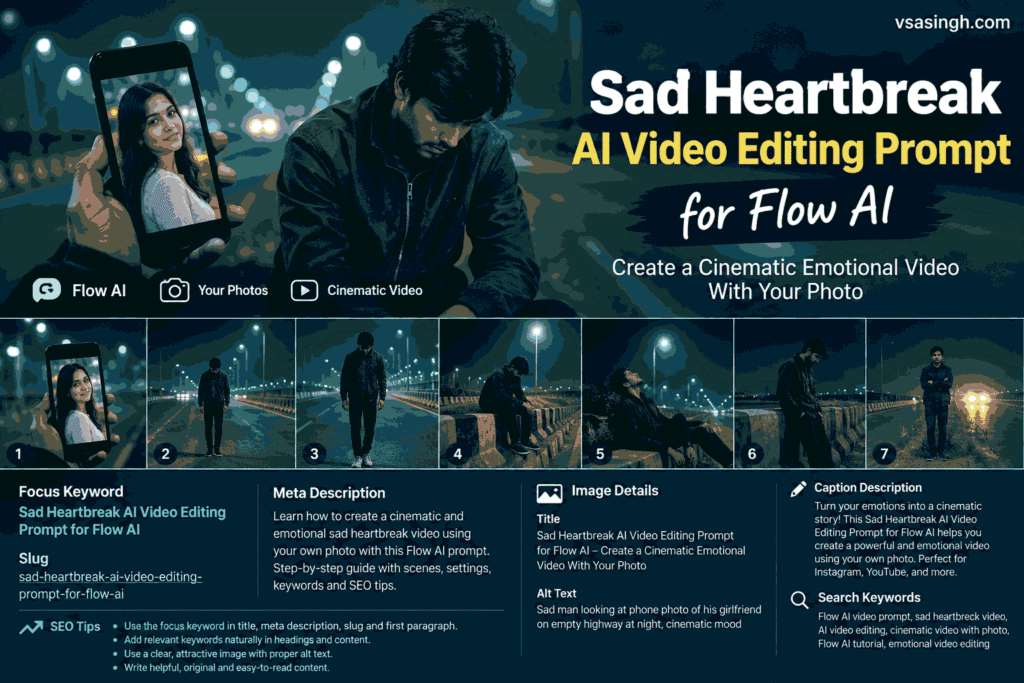
One of the video concepts that has become popular among AI creators is the Sad Heartbreak AI Prompt video. These videos usually focus on loneliness, memories, silence, nighttime locations, and emotional moments rather than dramatic action.
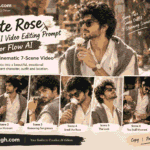
In this guide, vsasingh.com is sharing an original-style Sad Heartbreak AI Editing Prompt for Flow AI that you can use as a starting point for creating your own cinematic video.
The concept is simple: a person is alone at night, remembers someone special, looks at that person’s photograph on a phone, walks through a quiet highway environment, spends some time sitting alone, and finally ends the video with a calm cinematic shot.
The goal is not to create an overly dramatic story. Instead, the video should communicate emotion through body language, camera movement, lighting, environment and visual consistency.
You can use your own photograph as the main character reference and another photograph as the image displayed on the phone.
What Is a Sad Heartbreak AI Video?
A sad heartbreak AI video is a short cinematic sequence designed around emotions such as loneliness, memories, separation and reflection.
Instead of relying on dialogue, the story is communicated visually.
For example, the first scene can show a person looking at a photograph on their phone. The next scene can move to a quiet highway where the person is walking alone. Later, the character can sit on a road divider, look toward the night sky and eventually stand quietly near the road.
This type of storytelling works especially well for short-form content because viewers can understand the emotional situation without needing a long explanation.
The Cinematic Sad Heartbreak AI Prompt can be used as a creative project for platforms such as Instagram, YouTube Shorts and other social-media video formats, depending on the output dimensions you choose.
- The important thing is to maintain a consistent visual identity.
- The character should look like the same person in every scene.
- The clothes should remain unchanged.
- The environment should also feel like one continuous location.
- The lighting and overall cinematic style should remain similar from beginning to end.
That consistency can make an AI-generated sequence feel much more like a planned video rather than seven unrelated AI clips.
Sad Heartbreak Flow AI Prompt
Below is the main prompt concept prepared for this tutorial. You can customize the clothing, location, lighting and scene descriptions according to your own creative idea.
Main AI Video Prompt
Use Photo 1 as the primary visual identity reference for the male character. Preserve his recognizable facial features, hairstyle, natural skin appearance, approximate height and body proportions. The character should remain visually consistent throughout the complete sequence. Do not redesign his face or significantly alter his physical appearance between scenes.
Use Photo 2 only as the photograph displayed on the smartphone. The woman from Photo 2 must not appear as a separate physical character anywhere in the video. Her image should remain limited to the phone display.
Keep the character’s clothing identical throughout the video:
- Dark green zip-up jacket
- Black trousers
- Simple sandals
Do not change the outfit, colors or footwear between scenes.
The entire sequence should take place in the same nighttime environment. Create a quiet, nearly empty highway or bridge with teal-green streetlights extending into the distance. Include black-and-white concrete road dividers, patches of dry grass, a dark cloudy sky, subtle atmospheric haze and a few distant vehicle lights.
The environment should look like the same physical location throughout the complete sequence.
The emotional tone should be quiet, reflective and melancholic. Avoid exaggerated acting. Use subtle facial expressions and natural body movements.
Use a cinematic nighttime visual treatment with cool teal tones, deep shadows, moderate contrast and a subtle film texture.
Create a connected sequence of seven cinematic scenes.
1 – The Photograph
- Begin with a close-up composition showing a hand holding a smartphone.
- The phone screen displays the photograph from Photo 2.
- Keep the person’s photograph clearly visible on the screen while the nighttime highway remains softly out of focus behind it.
- Use shallow depth of field and gentle cinematic lighting.
- The scene should introduce the emotional story without showing the woman as a live person.
2 – Alone on the Road
- Move to a wide cinematic shot.
- The main character stands alone in the quiet highway environment.
- His posture is relaxed but reflective, with his head slightly lowered.
- The streetlights create depth behind him and the road extends toward the horizon.
- Keep the character’s clothing and appearance exactly consistent with Photo 1.
3 – Walking Through the Night
- Show the character walking slowly along the road.
- Use a medium or tracking shot.
- His hands remain naturally positioned and his movement should be slow rather than exaggerated.
- The road markings, concrete dividers and streetlights should create visual leading lines.
- Maintain the same nighttime atmosphere and cool cinematic color treatment.
4 – Sitting by the Divider
- Show the character sitting on a concrete road divider.
- His elbows can rest naturally near his knees while his head remains slightly lowered.
- Dry grass and the nighttime surroundings should be visible around him.
- Place a streetlight behind or slightly to the side of the character to create depth and a soft rim-light effect.
5 – Looking Toward the Sky
- Continue from the previous scene.
- The character remains seated but slowly changes his posture and looks toward the dark sky.
- Keep the movement subtle.
- The purpose of this shot is to create a quiet pause in the story.
- The sky, streetlights and surrounding road should maintain the same visual identity as the earlier scenes.
6 – Standing Near the Barrier
- Now show the character standing beside the road barrier.
- He leans lightly against the structure with his head lowered and hands naturally held together.
- Use dim lighting and a slightly closer camera composition.
- Avoid exaggerated sadness. The expression should remain restrained and realistic.
7 – Closing Shot
- End with a wide cinematic composition.
- The character stands on the road median or beside the divider and faces toward the camera.
- Distant vehicle headlights can be seen far behind him.
- Keep the character calm and reflective.
- The road, streetlights, foggy atmosphere and nighttime color grade should continue from the previous shots.
Use a slow cinematic ending rather than a sudden transition. Sad Heartbreak AI Prompt
Output style: 16:9 landscape, cinematic 1080p appearance, natural movement, consistent character identity, consistent clothing, realistic nighttime lighting, subtle film texture and smooth camera transitions.
If adding branding to the generated content, use your own website or creator name rather than copying another creator’s watermark.
Why Character Consistency Matters in AI Video
One of the biggest problems with AI-generated multi-scene videos is character inconsistency.
You may provide a photograph of a person, but the AI can sometimes generate slightly different facial features in different shots.
The hairstyle may change.
The jacket may change.
The body proportions may become different.
Sometimes even the person’s age or overall appearance can shift between scenes.
For an emotional video, this can be especially noticeable because the viewer is expected to follow one character through the entire story. Sad Heartbreak AI Prompt
That’s why the prompt should repeatedly establish the main visual identity.
Instead of simply saying:
“Create a man walking on a highway.”
a more useful instruction is to tell the AI that the same reference image should remain the identity anchor throughout the sequence.
The prompt can also repeat important elements such as:
- Same face
- Same hairstyle
- Same approximate body proportions
- Same clothing
- Same location
- Same lighting
- Same cinematic treatment
This does not guarantee perfect consistency, because AI generation can still vary, but it gives the model clearer instructions.
What Photos Do You Need?
Before starting the project, prepare your reference images.
Photo 1 – Main Character
Photo 1 should be the image of the person who will appear in the video.
For the best possible reference, choose an image where:
- The face is clearly visible
- The image is reasonably sharp
- The hairstyle can be identified
- The person’s overall appearance is easy to understand
- There are no extreme filters
- The face is not hidden by sunglasses or other objects
A simple, clear photograph is often more useful than a heavily edited social-media image.
The purpose of Photo 1 is to establish the visual identity of the main character.
Photo 2 – Phone Photograph
Photo 2 is used differently.
It represents the person whose photograph appears on the phone screen.
The important instruction is that this person should remain a photograph within the video.
The AI should not turn the person in Photo 2 into a second live character.
This distinction is important because otherwise an AI video generator may interpret the second reference image as another person who should appear physically in the environment.
How to Create the Video in Flow AI
Once your reference photos are ready, you can begin building the video.
Prepare Your Images
Start by selecting a clear image for the main character.
Then choose the photograph you want to display on the smartphone.
Keep both files ready before beginning the generation process.
It is useful to decide the character’s outfit beforehand as well.
For this concept, the outfit is a dark green jacket, black pants and sandals.
If you want a different look, you can replace these details with your own clothing concept.
Start a New Video Project
Open Flow AI and create a new Cinematic Sad Heartbreak AI Prompt video-generation project.
The exact interface and available features may change over time, so the names or positions of individual controls may not always remain identical.
Look for the option that allows you to provide an image reference and enter a text prompt.
Upload the main character photograph as the primary reference.
If the workflow supports an additional image reference, use the second photograph for the phone-screen element.
Add the Character Instructions
Tell the AI that the first image controls the identity of the main character.
This helps separate the two references.
A useful instruction is:
“Photo 1 controls the identity of the main character. Photo 2 is only the photograph displayed on the smartphone.”
You can then describe the clothing and environment.
This gives the model a clear hierarchy:
Photo 1 → Main character
Photo 2 → Phone photograph
Add the Cinematic Environment
The location is an important part of the visual storytelling.
For this concept, imagine a nearly empty nighttime highway.
The road contains:
- Teal-green streetlights
- Black-and-white concrete dividers
- Dry grass
- Dark sky
- Light atmospheric haze
- Occasional distant headlights
The environment should not suddenly change from one scene to another.
For example, if Scene 1 has teal streetlights and black-and-white dividers, Scene 4 should not suddenly look like a completely different city road.
Repeating the environment description can help maintain continuity.
Generate the Scenes
You can try generating the entire sequence as one prompt if the tool and workflow support it.
However, multi-scene generation can sometimes produce inconsistent results.
For better control, another approach is to generate each scene separately.
For example:
- 1: Phone photograph
- 2: Character standing on the road
- 3: Character walking
- 4: Character sitting
- 5: Character looking at the sky
- 6: Character near the barrier
- 7: Final wide shot
You can then combine the clips in a video editor.
This approach gives you more control over the duration, transitions and pacing of each shot.
Recommended Scene Duration
There is no single correct duration for an AI video, but short clips can work well for this style.
A possible structure could be:
| Scene | Suggested Duration | Main Focus |
|---|---|---|
| Scene 1 | 3–4 seconds | Phone photograph |
| Scene 2 | 3–4 seconds | Character standing |
| Scene 3 | 4–5 seconds | Walking |
| Scene 4 | 4 seconds | Sitting |
| Scene 5 | 3–4 seconds | Looking upward |
| Scene 6 | 3–4 seconds | Standing near barrier |
| Scene 7 | 4–5 seconds | Final wide shot |
You can make the final video shorter or longer depending on the platform and your editing style.
How to Make the Video Look More Cinematic
AI generation alone does not always create a convincing cinematic sequence.
Small editing decisions can make a significant difference.
Use Slow Transitions
Avoid extremely fast cuts.
The concept is based on quiet emotion, so slower transitions can fit the visual story better.
A simple crossfade or cinematic dissolve may work well between certain scenes.
Keep Camera Movement Controlled
Avoid unnecessary camera movement.
Slow tracking, gentle push-ins and stable wide shots can complement the mood.
If every shot has aggressive camera movement, the emotional tone can become confusing.
Maintain Similar Lighting
Lighting should remain consistent.
If the first scene is dark and cool, the following scenes should not suddenly become bright and warm.
Keep the nighttime atmosphere throughout the video.
Use Subtle Background Sound
Sound can significantly affect an emotional video.
Depending on your editing concept, you can use a soft instrumental background, ambient nighttime sounds or subtle road ambience.
Make sure any music or audio you use is properly licensed for your intended platform.
What If the AI Changes the Face?
This is one of the most common problems in AI video generation.
If the face changes from scene to scene, don’t immediately rewrite the entire prompt.
First strengthen the identity instructions.
For example, emphasize that:
Photo 1 is the fixed identity reference for the main character and the facial appearance should remain consistent throughout every shot.
You can also regenerate only the problematic scene instead of recreating the entire video.
This can save time and give you more control.
What If the Clothes Change?
If the jacket changes color or the footwear suddenly becomes different, repeat the clothing description.
For this concept, the outfit is:
Dark green zip-up jacket + black pants + sandals.
Avoid introducing alternative clothing descriptions later in the prompt.
If one scene says “dark green jacket” and another says “dark jacket,” the AI may interpret those descriptions differently.
Consistency in wording can therefore be useful.
What If the Location Changes?
Sometimes an AI model may transform a highway into a city street, bridge, parking area or another environment.
If that happens, reinforce the location.
Tell the AI that all scenes take place in the same nighttime highway environment.
Repeat distinctive elements such as:
- Teal-green streetlights
- Black-and-white dividers
- Dry grass
- Dark sky
- Same road structure
- Similar atmospheric haze
The more recognizable visual elements the environment has, the easier it may be to maintain a connected look.
What If the Phone Screen Looks Wrong?
Phone screens can be challenging for AI video models.
The photograph may become distorted, the face may change or the phone may disappear.
To reduce this problem, keep the instruction simple:
“The second reference image must appear only as a photograph displayed on the smartphone screen.”
You can also generate the opening shot separately.
This gives you more control over the phone composition.
If necessary, the phone-screen shot can be edited manually later.
Why Generating Individual Scenes Can Be Better
Although a single large prompt sounds convenient, generating seven scenes separately can sometimes produce more predictable results.
Each clip has one primary purpose.
For example, Scene 3 only needs to show the person walking.
Scene 4 only needs to show the person sitting.
Scene 7 only needs to deliver the final wide composition.
After generating them separately, you can arrange them in your preferred order.
This also allows you to replace one weak scene without regenerating the other six.
Editing the Generated Clips
Once the AI clips are ready, you can combine them in a video editor.
The exact editing application is up to you.
A simple workflow can be:
- Import all seven clips.
- Place them in the correct sequence.
- Trim unwanted frames.
- Add smooth transitions where necessary.
- Adjust brightness and contrast if required.
- Add suitable background audio.
- Add optional text.
- Export in the desired resolution.
Do not over-edit the footage.
The visual story is intentionally simple.
The empty road, slow movements and nighttime atmosphere are already doing most of the storytelling.
Suggested Text Overlay
If you want to add text to the video, keep it short.
Instead of filling the screen with paragraphs, use one or two simple lines.
For example:
“Some memories stay longer than people.”
Or:
“Not every goodbye needs words.”
These are examples of the type of short text that can complement the video.
You can also use your website branding, such as:
vsasingh.com
Keep the branding small and unobtrusive so it does not cover the main visual.
How to Keep the Emotional Tone Natural
One common mistake with emotional Sad Heartbreak AI Video Prompt is making the character appear excessively dramatic.
The story doesn’t need exaggerated crying, theatrical gestures or unrealistic expressions.
A more natural approach is to use:
- Slow walking
- Slightly lowered head
- Quiet posture
- Looking at the phone
- Sitting alone
- Looking toward the sky
- Calm facial expression
- Controlled camera movement
These small details can communicate the intended mood without making the video feel artificial.
Seven-Shot Story Structure
Let’s look at the complete story from a viewer’s perspective.
Opening – A Memory on the Phone
The first shot establishes the emotional connection.
The viewer sees a smartphone displaying the photograph.
The highway in the background is out of focus.
This immediately creates curiosity about the person in the photograph and the character holding the phone.
Second Shot – Isolation
The story then moves away from the phone.
The main character is now alone on the road.
The wide shot makes the person look small compared with the surrounding environment.
The empty highway becomes part of the storytelling.
Third Shot – Moving Forward
The character begins walking.
The movement suggests that time is continuing even though the person remains emotionally reflective.
The streetlights and road markings create depth.
Fourth Shot – A Quiet Pause
The character sits down.
This slows the story.
Instead of continuing to walk, he takes a moment to remain still.
The road divider and dry grass add texture to the scene.
Fifth Shot – Looking Up
The character looks toward the sky.
This creates a visual change without changing the location.
The camera can remain relatively calm while the character’s posture provides the movement.
Sixth Shot – Another Moment Alone
The character stands beside the barrier.
This shot can be slightly closer than the previous wide shots.
The darker lighting creates a more intimate feeling.
Final Shot – The Road Continues
The last shot returns to a wide composition.
The character faces the camera while distant headlights appear behind him.
The road continues into the distance.
This creates a natural ending without requiring dialogue.
Common Problems When Creating This AI Video
Problem 1: Different Faces
Cause: The AI does not maintain identity perfectly.
Possible solution: Strengthen the reference-image instruction and regenerate the affected scene.
Problem 2: Different Clothes
Cause: The model interprets the outfit differently.
Possible solution: Repeat the exact clothing description.
Problem 3: Different Locations
Cause: The model generates each scene independently.
Possible solution: Repeat the distinctive highway details in every scene prompt.
Problem 4: The Second Person Appears Physically
Cause: The AI interprets Photo 2 as a character reference.
Possible solution: Clearly state that Photo 2 is only a photograph shown on the smartphone.
Problem 5: Too Much Camera Movement
Cause: The prompt does not specify restrained cinematography.
Possible solution: Request slow, controlled and cinematic camera movement.
Problem 6: Mood Looks Too Dramatic
Cause: Strong emotional keywords can sometimes lead to exaggerated acting.
Possible solution: Use phrases such as “subtle expression,” “restrained emotion” and “natural body language.”
Tips for Creating Better AI Videos
A strong AI prompt is not necessarily the longest possible prompt.
What matters is clarity.
Instead of adding dozens of unrelated visual details, focus on the elements that need to remain stable.
For this project, the most important elements are:
Character → Clothing → Location → Lighting → Mood → Camera → Scene order
If those elements remain consistent, the final sequence is more likely to feel connected.
Another useful approach is to make a small test clip before generating all seven scenes.
Generate the first scene and check:
- Does the face look correct?
- Is the clothing correct?
- Does the nighttime environment look right?
- Does the phone display the correct photograph?
- Is the cinematic style appropriate?
If the answer is yes, continue with the remaining scenes.
If something is wrong, fix the prompt before spending time generating additional clips.
Can You Use This Prompt for Reels and Shorts?
Yes, the concept can be adapted for short-form social content.
The original cinematic setup is described in a landscape format, but you can create a vertical version if your target platform requires it.
For vertical content, the composition needs more attention.
The character should remain within the central area of the frame so that important parts of the shot are not lost during cropping.
- For Instagram Reels and YouTube Shorts, a vertical composition can be more practical.
- For website videos, YouTube landscape videos or cinematic presentations, 16:9 can be a suitable format.
- The important thing is to decide the final platform before generating the clips whenever possible.
A More Compact Version of the Prompt
If you prefer using a shorter prompt, you can create a condensed version while retaining the most important instructions.
Use Photo 1 as the fixed identity reference for the main male character. Preserve his recognizable face, hairstyle, skin appearance and natural body proportions throughout every scene. Use Photo 2 only as a photograph displayed on the smartphone; do not show the woman as a live character.
Keep the same dark green zip-up jacket, black pants and sandals throughout the sequence. All seven scenes take place on the same empty nighttime highway with teal-green streetlights, black-and-white concrete dividers, dry grass, dark sky, light atmospheric haze and occasional distant vehicle headlights.
Create a quiet, reflective cinematic mood with cool teal nighttime grading, deep shadows, subtle film texture and restrained natural body language.
1: Close-up of smartphone displaying Photo 2.
2: Wide shot of the man standing alone on the highway.
3: Medium tracking shot of him walking slowly.
4: He sits on the concrete divider with his head lowered.
5: He remains seated and looks toward the night sky.
6: He stands beside the road barrier with a quiet reflective posture.
7: Wide final shot of him facing the camera while distant headlights appear behind him.
Maintain the same person, outfit, location, lighting and color treatment throughout. Use slow cinematic movement and natural expressions.
Final Thoughts
Flow Sad Heartbreak AI Prompt gives creators the ability to turn a simple emotional concept into a complete visual story.
For a heartbreak-themed video, you don’t necessarily need complicated dialogue or a large number of characters. A phone photograph, an empty nighttime road, controlled camera movement and consistent character design can be enough to communicate the idea.
The biggest challenge is maintaining consistency.
Always pay attention to the character’s face, hairstyle, clothing, environment and lighting. If one generated scene looks different from the others, regenerate that individual scene instead of changing the entire project.
Using separate clips can also give you greater editing control.
After generation, you can combine the scenes, add suitable background audio, make small color adjustments and create the final version for your preferred platform.
Most importantly, treat the AI prompt as a creative starting point rather than a guarantee of a perfect result. Different generations can produce different results, so experimentation is a normal part of AI video creation.
If you’re creating content for vsasingh.com, you can also add your own website branding to the final video and article so viewers can identify the original creator or publishing source.
The combination of a personal reference Cinematic Sad Heartbreak AI Prompt, a meaningful photograph, a consistent nighttime environment and slow cinematic storytelling can produce a visually engaging heartbreak-themed AI video without requiring a traditional film setup.
This prompt is intended as a creative template. You can change the character, outfit, location, lighting, camera angles and number of scenes to create your own original version.
For more AI prompts, creative editing ideas, image-generation tutorials and practical AI content-creation guides, keep following vsasingh.com.

Leave a Reply